
When I first started photography, ISO was one of the most confusing camera settings for me. I understood that aperture controlled depth of field and shutter speed controlled motion, but ISO felt like a mystery.
I remember photographing a friend’s birthday party indoors. The room was dimly lit, and my photos kept coming out dark. I increased my ISO from 100 to 1600, and suddenly the images became much brighter. It felt like magic.
However, when I zoomed into those photos later, I noticed something strange. The images looked grainy and less detailed than my outdoor photos. That was the day I learned an important photography lesson: ISO can help you capture brighter images, but it also comes with trade-offs.
In this guide, I’ll explain what ISO is, how it works, when to change it, and how I personally use it in different photography situations.
Quick Answer: What Is ISO in Photography?
ISO is a camera setting that controls how sensitive your camera’s sensor is to light.
- Low ISO (100–200) creates cleaner images with less noise.
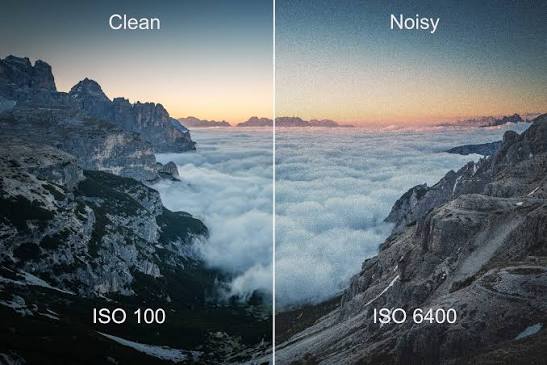
- High ISO (800–6400+) makes photos brighter but can introduce grain or digital noise.
As a general rule, use the lowest ISO possible while maintaining a proper exposure.
What Does ISO Stand For?
ISO stands for the International Organization for Standardization.
In photography, ISO originated from film photography. Different film stocks had different light sensitivities. Digital cameras adopted the same numbering system, which is why you’ll see settings like:
- ISO 100
- ISO 200
- ISO 400
- ISO 800
- ISO 1600
- ISO 3200
- ISO 6400
The higher the number, the more sensitive your camera becomes to light.
Understanding ISO with a Real-Life Example
Imagine you’re standing in a dark room trying to read a book.
You have two options:
- Turn on a brighter light.
- Make your eyes work harder to see.
Increasing ISO is similar to making your camera sensor work harder to detect available light.
The result is a brighter image, but the camera also captures more unwanted noise.
How ISO Affects Your Photos
ISO directly affects three important things:
1. Brightness
The most obvious effect is image brightness.
For example:
- ISO 100 = Darker image
- ISO 1600 = Brighter image
- ISO 6400 = Much brighter image
If you’re shooting in low light, increasing ISO can help maintain proper exposure.
2. Image Quality
Lower ISO values generally produce the best image quality.
When I shoot landscapes during daylight, I almost always use ISO 100 because it provides:
- Maximum detail
- Better colors
- Less noise
- Sharper images
3. Digital Noise
Noise appears as tiny colored specks or grain in a photo.
The higher your ISO, the more likely you’ll see:
- Grainy textures
- Reduced sharpness
- Loss of detail
Modern cameras handle high ISO much better than older models, but noise is still something photographers try to minimize.
Common ISO Settings Explained
ISO 100
Best for:
- Bright sunny days
- Landscapes
- Architecture
- Product photography
I use ISO 100 whenever plenty of natural light is available.
ISO 200–400
Best for:
- Slightly cloudy days
- Outdoor portraits
- General photography
This range still produces very clean images.
ISO 800–1600
Best for:
- Indoor photography
- Evening events
- Family gatherings
I frequently use ISO 1600 during indoor shoots when flash isn’t allowed.
ISO 3200–6400
Best for:
- Concerts
- Weddings
- Sports arenas
- Night photography
Many professional cameras perform surprisingly well in this range.
ISO 12800 and Above
Best for:
- Extremely dark environments
- Emergency situations
- Documentary photography
Image quality usually starts to decline significantly at these settings.
How I Choose ISO in Different Photography Situations
Landscape Photography
My typical settings:
- ISO 100
- Tripod
- Slow shutter speed
Since landscapes don’t move, I keep ISO low for maximum quality.
Portrait Photography
Outdoor portraits:
- ISO 100–400
Indoor portraits:
- ISO 400–1600
The goal is maintaining image quality while keeping shutter speed fast enough to avoid blur.
Wildlife Photography
Wildlife often requires fast shutter speeds.
My typical ISO:
- ISO 400–3200
I’d rather have a slightly noisy image than miss the shot completely.
Sports Photography
Sports demand speed.
Typical ISO settings:
- ISO 800–6400
Fast shutter speeds are essential for freezing action.
Night Photography
Night photography can be challenging.
Depending on the scene, I use:
- ISO 800–6400
- Tripod when available
Sometimes a higher ISO is the only way to capture the moment.
The Relationship Between ISO, Aperture, and Shutter Speed
Photography exposure depends on three settings:
Aperture
Controls how much light enters the lens.
Shutter Speed
Controls how long light reaches the sensor.
ISO
Controls the sensor’s sensitivity to light.
Together, these form the Exposure Triangle.
For example:
If your photo is too dark, you can:
- Open the aperture
- Slow the shutter speed
- Increase the ISO
Most photographers adjust all three settings depending on the situation.
Auto ISO vs Manual ISO
Auto ISO
Advantages:
- Fast
- Convenient
- Great for beginners
Many photographers use Auto ISO for street photography and events.
Manual ISO
Advantages:
- Full control
- Consistent results
- Better creative decisions
I personally switch between Auto ISO and Manual ISO depending on the assignment.
Common ISO Mistakes Beginners Make
Using High ISO All the Time
Many beginners leave their camera at ISO 3200 or higher.
This creates unnecessary noise when lower settings would work perfectly.
Forgetting to Lower ISO
One mistake I’ve made countless times:
After a night shoot at ISO 6400, I forget to reset it the next day.
The result?
Noisy photos in bright daylight.
Fearing High ISO Too Much
Some photographers avoid high ISO completely.
Sometimes a noisy image is better than no image at all.
Photography is about capturing moments, not chasing perfect settings.
How to Reduce Noise at High ISO
Here are techniques I regularly use:
Use a Tripod
A tripod allows slower shutter speeds and lower ISO settings.
Shoot in RAW
RAW files preserve more detail and allow better noise reduction during editing.
Use Better Light
Even a small amount of additional light can significantly reduce the need for high ISO.
Upgrade Equipment
Modern cameras perform much better at high ISO values than older cameras.
My Personal ISO Rule
After years of photography, my simple rule is:
Use the lowest ISO that allows you to get the shot you want.
A technically perfect image means nothing if you miss the moment.
If increasing ISO helps you capture an important scene, it’s usually worth it.
Frequently Asked Questions
What is the best ISO for photography?
ISO 100 is generally considered the best for image quality when enough light is available.
Does higher ISO make photos brighter?
Yes. Increasing ISO makes your camera sensor more sensitive to light, resulting in brighter images.
Is ISO 1600 too high?
No. Modern cameras often produce excellent results at ISO 1600.
What ISO should I use indoors?
Most indoor photography requires ISO settings between 400 and 3200, depending on available light.
Why are my photos grainy?
Grainy photos are usually caused by using a high ISO setting in low-light conditions.
Is Auto ISO good for beginners?
Yes. Auto ISO can help beginners focus on composition and creativity while learning exposure basics.
Final Thoughts
Learning ISO changed the way I approach photography. In the beginning, I thought it was just another complicated camera setting. Over time, I realized it’s one of the most important tools for controlling exposure.
When I’m photographing a sunrise landscape, I keep ISO as low as possible. When I’m covering an indoor event or capturing fast-moving subjects, I’m not afraid to increase it if needed.
The key is understanding that ISO isn’t about finding one perfect number. It’s about choosing the right setting for the situation.
The more you practice, the more naturally you’ll know when to use ISO 100, ISO 800, or even ISO 6400. And once that happens, you’ll have much greater control over your photography and the images you create.

Leave a Reply