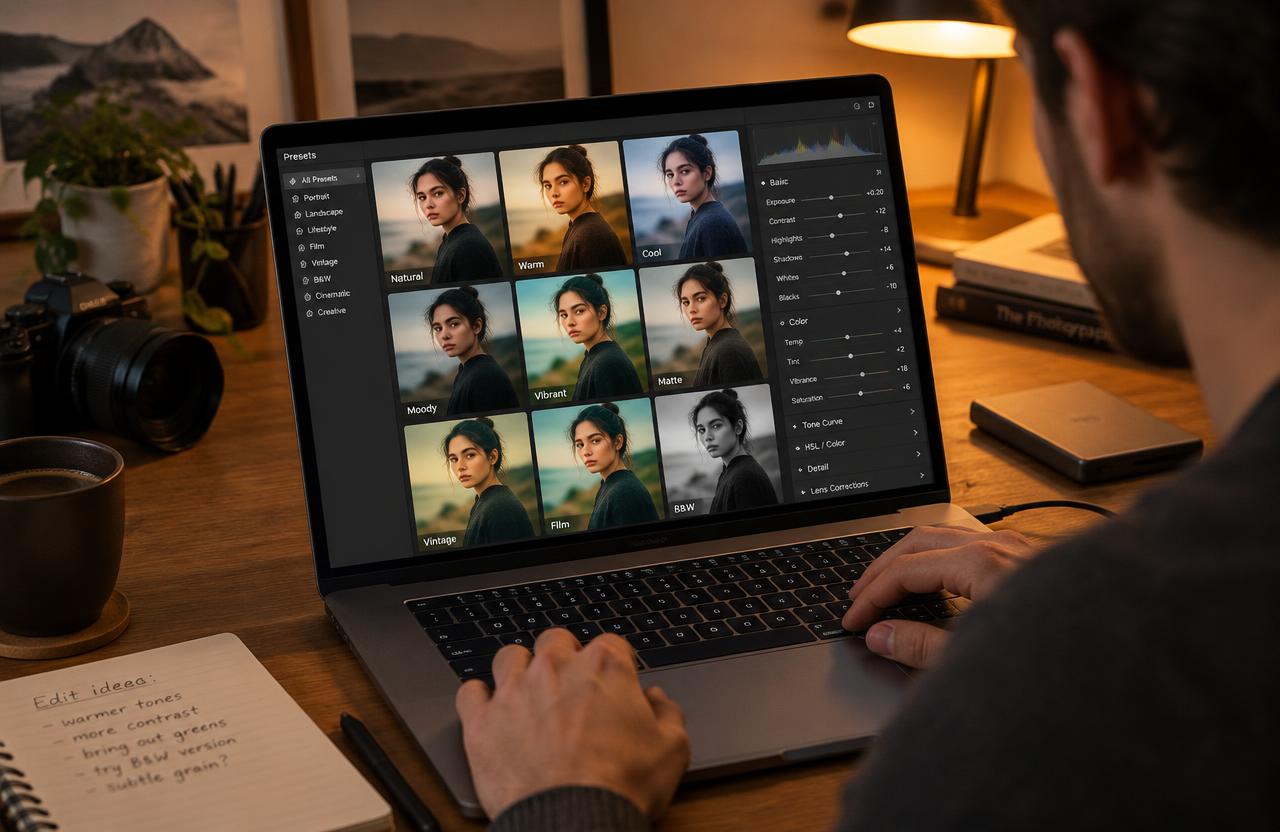
In photo editing, a preset is a saved collection of settings that you can apply to another photograph. It might establish a black-and-white treatment, adjust color and contrast, add grain, or combine several corrections. The preset changes included settings; it does not understand your intentions automatically. Adobe’s Lightroom preset documentation describes presets as a way to apply editing treatments efficiently. Think of one as a reusable starting recipe. Two photographs receiving that recipe may still look different because their subjects, exposure, lighting, camera interpretation, and existing adjustments are different.
01Not every preset performs the same job
Creative presets establish a visual treatment, such as muted greens or a high-contrast monochrome look. Other presets are built for practical corrections or selective adjustments.
Software also uses the word preset for export settings, metadata, and other workflows, which are not the same as a Develop or editing preset.
Check what a product actually includes before downloading or buying it. A JPEG-export preset will not create a cinematic color grade.
Likewise, a color-treatment preset does not automatically provide the output dimensions, sharpening, or file naming needed for delivery.
02Presets, profiles, and filters are not identical
A Lightroom editing preset can apply a collection of adjustable settings, potentially including a profile selection. A profile influences the interpretation or creative rendering of color and tone without operating simply as a list of equivalent slider movements.
A filter is a broader term whose meaning varies between applications.
These distinctions matter when diagnosing a strong effect. A preset may leave basic sliders apparently modest while its selected profile contributes substantially to the appearance.
Inspect the profile and all relevant panels before concluding that the visible Exposure or Contrast slider explains everything the preset changed.
03Why one preset looks different on every image
A warm treatment applied to a cool shaded portrait will not behave like the same treatment applied to an orange sunset. Existing skin color, background colors, exposure, and camera profiles all influence the result.
Raw and already-processed JPEG files also provide different starting material.
Adobe’s Camera Raw introduction explains that raw processing preserves the original capture data while recording adjustments separately. A JPEG already contains processing decisions made earlier.
Neither file type guarantees a good preset result: evaluate the actual image rather than expecting a promotional before-and-after example to reproduce itself.
04Apply a preset in Lightroom thoughtfully
In Lightroom desktop, open a photograph and locate Presets. Browse or preview the available options, then select a treatment that supports the image.
Adobe’s official Lightroom preset instructions provide the application-specific workflow; panel positions and available collections can vary by version.
After applying it, inspect exposure, white balance, skin, strong colors, and important highlights. Use the preset Amount control when available to moderate the treatment, but do not assume that reducing strength solves every problem.
A separate white-balance adjustment may be more appropriate than weakening a useful contrast treatment.
05Understand Lightroom Classic’s separate workflow
Lightroom Classic places editing presets in the Develop workflow. Select an image, open the Presets panel, preview a treatment, and apply it.
Adobe maintains separate documentation for Classic, so follow that guidance rather than assuming every Lightroom desktop or mobile instruction matches exactly.
Watch which controls change. Applying another preset is not necessarily a simple additive layer: included settings can replace current values, while settings excluded from the new preset can remain.
If experimentation becomes confusing, return to a known editing state or use the application’s history and comparison tools before continuing.
Worked example
06A worked batch-editing example

Imagine a hypothetical set of twenty-four portraits photographed in three lighting situations, with eight images in each group. Applying one preset to all twenty-four may establish a common color treatment, but the three groups can still need different exposure and white-balance corrections.
Edit one representative image per group first. Suppose those representatives require Exposure adjustments of +0.30, −0.20, and +0.10.
Those are illustrative editor values, not universal recommendations. Synchronize only suitable settings within each group, then inspect every photograph.
Twenty-four images divided into three groups of eight is a workflow plan, not proof that three edits finish the job.
07Create a preset that saves only what you intend
Begin with a photograph whose treatment you understand. Choose the create-preset command in your Lightroom application, name the preset clearly, choose a group, and select the settings to include.
Adobe’s preset documentation explains these creation options.
For a reusable creative look, consider excluding image-specific exposure, white balance, crop, and local corrections unless they serve a deliberate purpose. A preset called “Soft neutral color” is easier to evaluate than an unexplained numbered name.
Test it on several different images before treating it as a reliable part of your workflow.
08Import carefully and check compatibility
Use the application’s preset-import command and follow Adobe’s instructions for the supported file or package type. Modern Lightroom preset sharing commonly involves XMP files, while older products and some third-party workflows use other formats.
Do not assume an arbitrary file extension will work everywhere.
Before purchasing a pack, confirm the application, version, device requirements, file types, and any required profiles. Lightroom, Lightroom Classic, and mobile workflows are related but not identical.
Keep a backup of your own preset files and meaningful names so a later migration does not depend on remembering anonymous downloads.
Troubleshooting
09An illustrative portrait-editing mistake
Imagine a hypothetical photographer applying a muted outdoor preset to an indoor portrait under warm lamps. The image gains pleasing contrast, but the subject’s skin becomes orange and the blue shirt turns unnaturally dull.
Buying another preset is not necessarily the useful next step.
The photographer checks the preset’s white-balance and color changes, corrects the underlying warmth, and reduces the problematic blue-channel adjustment. The contrast treatment remains.
This fictional example illustrates the right attitude: keep the parts that serve the photograph, identify what causes the problem, and avoid treating a preset as an indivisible finished style.
Troubleshooting
10Troubleshoot missing presets and excessive effects
If a preset does not appear, check the selected application, import location, grouping, and compatibility with the current file. A missing required profile or unsupported feature can also affect availability or appearance.
Consult the official instructions for your installed version before repeatedly reimporting the same package.
If the effect looks harsh, inspect contrast, curves, clarity, saturation, and profile selection. If only some images look wrong, compare their capture conditions.
If an adaptive preset targets the wrong area, inspect its masks and update or refine them where supported. Automated selection still needs visual checking.
11Decide whether a preset is worth keeping
Keep a preset when it produces a useful starting point across the kinds of photographs you actually make, and when you understand how to refine it. Reject or revise it when it repeatedly damages skin, clips important tones, distorts product color, or requires more repairs than a straightforward manual edit.
Evaluate paid packs with the same criteria as free ones. More presets do not automatically mean more useful choices.
Build a small, clearly named collection organized by purpose. Consistency comes from compatible decisions about capture and editing, not from applying one fashionable recipe to every scene.
FAQ
12Common questions and a learning exercise
Are presets cheating? They are workflow tools; the important questions are whether the result is appropriate and whether any claims about the image are honest. Can presets fix missed focus or badly clipped capture detail? No. Do they permanently change the original raw capture in Lightroom’s normal editing workflow? The adjustments are nondestructive, though exported files render those decisions.
For practice, apply one preset to a daylight portrait, an indoor scene, and a landscape. Record what changed, what improved, and what needed correction. Then create a simpler version containing only the settings you genuinely want to reuse.
Sources & further reading
These references support the technical explanations. Exercises and starting settings are illustrative and should be adapted to your equipment and conditions.
- Adobe: Edit photos with Presets in Lightroom
- Adobe: Apply Presets in Lightroom Classic
- Adobe: Introduction to Camera Raw
Free resources from LensSuite
Was this guide helpful?